Showing posts with label security management. Show all posts

Sunday, April 13, 2008

"Block the Bad" OSS IPS with Content Filtration and Transparent Proxy Acceleration pt 1.


In this two part series I will discuss and demonstrate the creation of an inline security and content filtration system built on FreeBSD 7.0R. What is a security and content filtration system you might ask? Simply put it is a system that has the capabilities of an IPS with the included benefit of advanced content filtration (things like blacklists, page content scoring "keywords etc", greylists, whitelists and so on...).

This first part, entitled "block the bad" will deal with the IPS aspect of the system that includes some new "or newly revisited" ways of utilizing snortsam with barnyard rather than directly patching snort. This is good for a variety of reasons that include the capability to keep your snort version updated without having to continually re-patch it for snortsam, and not having to load snort down with more work than what it was intended "SNIFFING J00r PAket F00".

Some things in the below documented barnyard snortsam plugin have been hacked together, and I am sure that more capable individuals "rotorhead, Obiwan..." will write a non-hacked-together plugin in the near future. But this will get you up and rolling for now.

A few assumptions are made before we get started... the first is that you have already built snort (2.8.1 is the latest as of the time I wrote this), and if not that you can follow the directions to do so on a previous posting of mine. The second assumes if you want to see output such as BASE, you read and followed that entire posting. The third assumption is that you know how to modify your kernel options and ultimately make and install a new kernel. The fourth and final assumption is that if any of the previous assumptions are not true, you know how to use google.

Now, to the heart of the subject at hand, we will be using the following for the remainder of the excercise:

  1. Snort 2.8.1 (see above)
  2. barnyard 0.20.0 (with a modified snortsam plugin)
  3. snortsam 2.52
  4. ipf
  5. ipfw (this will come into play in the next part re: content filtering, but can also be used to block by entire source or destination *not protocol/port* hence ipf)
So, for our first step (since we have snort built/running) let's get our barnyard patched so that we have the snortsam plugin. If you previously built barnyard and still have all of the source, that's great... but remember to make clean before we do anything. For my purposes I'll be demonstrating with a freshly downloaded barnyard. You will need autotools "cd /usr/ports/devel/autotools/ && make install clean" to finish the patch work.

[jj@Azazel /usr/home/jj]$ wget http://www.snort.org/dl/barnyard/barnyard-0.2.0.tar.gz

2008-04-13 18:14:39 (537 KB/s) - `barnyard-0.2.0.tar.gz' saved [161543/161543]

[
jj@Azazel /usr/home/jj]$ tar xvfz barnyard-0.2.0.tar.gz
x barnyard-0.2.0/

[
jj@Azazel /usr/home/jj]$ wget http://www.snortsam.net/files/barnyard-plugin/barnyard-snortsam-patch.gz

2008-04-13 18:16:37 (148 KB/s) - `barnyard-snortsam-patch.gz' saved [27149/27149]

[
jj@Azazel /usr/home/jj]$ gunzip barnyard-snortsam-patch.gz
[jj@Azazel /usr/home/jj]$ cd barnyard-0.2.0
[
jj@Azazel /usr/home/jj/barnyard-0.2.0]$ patch -p1 < ../barnyard-snortsam-patch
Hmm... Looks like a unified diff to me...
...
Hunk #1 succeeded at 1.
Hunk #2 succeeded at 33.
Hunk #3 succeeded at 54.
...
done
[
jj@Azazel /usr/home/jj/barnyard-0.2.0]$ ./autojunk.sh
configure.in:147: warning: underquoted definition of SN_CHECK_DECL
configure.in:147: run info '(automake)Extending aclocal'
configure.in:147: or see http://sources.redhat.com/automake/automake.html#Extending-aclocal
autoheader-2.61: WARNING: Using auxiliary files such as `acconfig.h', `config.h.bot'
autoheader-2.61: WARNING: and `config.h.top', to define templates for `config.h.in'
autoheader-2.61: WARNING: is deprecated and discouraged.
autoheader-2.61:
autoheader-2.61: WARNING: Using the third argument of `AC_DEFINE' and
autoheader-2.61: WARNING: `AC_DEFINE_UNQUOTED' allows one to define a template without
autoheader-2.61: WARNING: `acconfig.h':
autoheader-2.61:
autoheader-2.61: WARNING: AC_DEFINE([NEED_FUNC_MAIN], 1,
autoheader-2.61: [Define if a function `main' is needed.])
autoheader-2.61:
autoheader-2.61: WARNING: More sophisticated templates can also be produced, see the
autoheader-2.61: WARNING: documentation.
[
jj@Azazel /usr/home/jj/barnyard-0.2.0]$
Now that we have the main part of the patch completed we need to make a few quick modifications to "src/output-plugins/op_alert_fwsam.c" so that it handles the barnyard output properly and loads the sid-msg.map file via a hard coded path (line 191). I threw a patch out there so that you don't need to do this manually, located here: http://www.redsphereglobal.com/data/tools/security/patches/barnyard-snortsam-hack.gz.
[jj@Azazel /usr/home/jj]$ wget http://www.redsphereglobal.com/data/tools/security/patches/barnyard-snortsam-hack.gz

2008-04-13 18:52:54 (1.15 MB/s) - `barnyard-snortsam-hack.gz' saved [641/641]

[
jj@Azazel /usr/home/jj]$ gunzip barnyard-snortsam-hack.gz
[
jj@Azazel /usr/home/jj]$ cd barnyard-0.2.0
[
jj@Azazel /usr/home/jj/barnyard-0.2.0]$ patch -p1 < ../barnyard-snortsam-hack Hmm... Looks like a unified diff to me... The text leading up to this was: ...
Patching file src/output-plugins/op_alert_fwsam.c using Plan A...
Hunk #1 succeeded at 188.
Hunk #2 succeeded at 815.
done
[
jj@Azazel /usr/home/jj/barnyard-0.2.0]$
This patch or "hack" has assumed that the location of your sid-msg.map is at /usr/local/etc/snort/sid-msg.map if this is not the case, you will need to edit /src/output-plugins/op_alert_fwsam.c around line 191 and specify the correct path. At this point you can configure barnyard and build as you normally would.
[jj@Azazel /usr/home/jj/barnyard-0.2.0]$./configure --enable-mysql
[jj@Azazel /usr/home/jj/barnyard-0.2.0]$make
[jj@Azazel /usr/home/jj/barnyard-0.2.0]$sudo make install
Your barnyard is now ready and we will cover the config file and startup after we get ipf and snortsam up and running.

The next step is to add the following to our Kernel so that we have ipf and ipfw enabled and running by default at boot.
# IPFW support
options IPFIREWALL #Enable IPFW directly in the kernel
options IPFIREWALL_FORWARD #Enable the Ip Forwarding function of IPFW
options IPFIREWALL_VERBOSE
options IPFIREWALL_DEFAULT_TO_ACCEPT
options IPDIVERT #allow this host to divert packets to/through different ints and routes

# IPF Support - default is to accept
options IPFILTER
options IPFILTER_LOG
Once these have been added please build your kernel, install and reboot. At this point we are ready to fetch and make snortsam.
[jj@Azazel /usr/home/jj]$ wget http://www.snortsam.net/files/snortsam/snortsam-src-2.52.tar.gz

2008-04-13 19:17:28 (497 KB/s) - `snortsam-src-2.52.tar.gz' saved [1075606/1075606]

[
jj@Azazel /usr/home/jj]$ tar xvfz snortsam-src-2.52.tar.gz
x snortsam
[
jj@Azazel /usr/home/jj]$ cd snortsam
[
jj@Azazel /usr/home/jj/snortsam]$ sh ./makesnortsam.sh
-------------------------------------------------------------------------------
Building SnortSam (release)
-------------------------------------------------------------------------------
-------------------------------------------------------------------------------
Building SnortSam (debug)
-------------------------------------------------------------------------------
Done.
[
jj@Azazel /usr/home/jj/snortsam]$sudo cp snortsam* /usr/local/bin/
That's it for the snortsam build, now we are ready to configure everything and fire it up for a test! The first thing that we will configure is our snortsam. There is a good amount of documentation under snortsam/docs/README.conf that covers basic configuration. For our purposes we will create the file /etc/snortsam.conf and place the following in it.
defaultkey secrets
port 6783
accept 192.168.1.0/24
keyinterval 30 minutes
ipf bge0
This configuration specifies a default key of "secrets" and that the snortsam daemon should listen on port 6783 for connectoins from the 192.168.1.0/24 network. The configuration also specifies that the connection between the client (barnyard) and snortsam daemon will be rekeyed every 30 minutes and that ipf will be used on bge0 locally.

On to the barnyard configuration, this file will be barnyard-snortsam.conf located at /usr/local/etc/. The only line that needs to be in this file is the one that calls the snortsam plugin for barnyard and specifies the host:port/password
output alert_fwsam: 192.168.1.7:6783/secrets
The barnyard snortsam plugin uses a sid-block.map file to define what sids will be blocked, how they will be blocked and for how long they will be blocked. The format is quite simple "sid: where[option],duration;" and to test we will put the file at /usr/local/etc/snort/sid-block.map with the following entry
9999999: src[conn], 15 seconds;
I chose sid 9999999 so that I could create a custom rule in my local.rules to test my configuration.
alert icmp any any -> 1.2.3.4 any (msg:"test"; sid:9999999;)
Assuming you were able to add that rule, we are now at the point to fire things up and give it a good old fashioned roll (all in debugging verbose mode of course)!

Restart your snort so that it sees the new SID if you have not done so... -HUP FTW!@!!
Start snortsam (must be as root right now to have access to ipf)
[jj@Azazel /usr/home/jj]$ sudo snortsam-debug
Start barnyard with the new config file (even if you have a previosly running barnyard from the previous security appliance article... this will run at the same time, we have specified a new waldo file and pid file). Note that the following is ALL ONE LINE... no line breaks or crs! Note that this uses the snort.alert and not the snort.log just like the syslog facility.
[jj@Azazel /usr/home/jj]$ sudo /usr/local/bin/barnyard -c /usr/local/etc/barnyard-snortsam.conf -g /usr/local/etc/snort/gen-msg.map -s /usr/local/etc/snort/sid-msg.map -d /var/log/snort/ -f snort.alert -w /var/log/snort/barnyard-snortsam.waldo -p /usr/local/etc/snort/classification.config -X /var/barnyard-snortsam.pid -vvv
After starting barnyard you should see the following debug output from your snortsam-debug:
Debug: Connection from: 192.168.1.7.
Debug: Received Packet: CHECKIN
Debug: Snort SeqNo: cbb9
Debug: Mgmt SeqNo : 7000
Debug: Status : 1
Debug: Version : 14
Now that everything is up and running we can test. The best way to test all aspects is to point a separate system at the IP of this box (default router/gateway) or on my system as evident by the above config "192.168.1.7" and ping 1.2.3.4 with that separate system. The ipfw options that we previously set in the kernel will allow this host to simply route the traffic to the proper destination. You should see debug output from your snortsam-debug as such:
Blocking host 192.168.1.43 in connection 192.168.1.43->1.2.3.4:0 (icmp) for 60 seconds (Sig_ID: 9999999).
Debug: [ipf][28201600] Plugin Blocking...
Debug: [ipf][28201600] command /bin/echo "@1 block in log level local7.info quick on bge0 proto 1 from 192.168.1.43/32 to 1.2.3.4/32"|/sbin/ipf -f -
We can see from the output that it is blocking the source address of 192.168.1.43 and proto 1 (ICMP) only. This means that this host can still browse the internet and do everything (other than send icmp to 1.2.3.4 for 60 seconds), this is a function of the [conn] option in the sid-block.map file.

Wonderful, we now have a functioning version of snortsam running off of the snort output and not snort directly. This means that we can upgrade / change our snort instance itself and not have to re-patch and mess with that... (this of course assumes that the version you use can output unified so that your patched version of barnyard can read it). The final step in this process is to add the sids that you want to block to the sid-msg.map file. I have modified the create-sidmap.pl file to create a sid-block.map compatible output by reading all of the .rules files in a directory and dumping "sid: src[conn], 30min;" output. This output blocks the service by source that the alert was generated from for 30 minutes. The file can be obtained at http://www.redsphereglobal.com/data/tools/security/patches/create-sidblock.pl.gz. Usage is simple and as follows (again, note that it's one line):
[root@Azazel /home/jj]# ./create-sidblock.pl /usr/local/etc/snort/rules/ > /usr/local/etc/snort/sid-block.map
[root@Azazel /home/jj]# tail -n 3 /usr/local/etc/snort/sid-block.map
2500000: src[conn],30min;
2510000: src[conn],30min;
9999999: src[conn],30min;
I suggest that you not put ALL sids in this file, but rather take a subset from rules files that you know are bad news. To do this simply copy the .rules files into a directory of your choice and run the script against that directory (note that the sid-block.map must always live in /usr/local/etc/snort at this time). Other suggestions include daemonizing your barnyard instance (-D) rather than -vvv. The rest you can figure out.

The next part of this series will cover adding content filtration and a transparent squid instance into the mix on this box.

Cheers,
JJC

Wednesday, March 19, 2008

pauldotcommunity.blogspot.com

I will be contributing to the pauldotcommunity blog site moving forward. You will find posts in both this blog and global-security. Hopefully we will be able to publish some useful information in at least one of these locations :-P


Cheers,
JJC

Monday, March 17, 2008

HeX 1.0.3 LiveUSB Final (Bug Fixes)

I just finished the bugfix version of the HeX 1.0.3 Live (CNY Release) image.

You can get it (in torrent form) from the Security Torrent Depot at http://www.redsphereglobal.com:88/torrent.html?info_hash=77f31dbc8d641500530760e62f17d1a08e433b96 or you can get it from the below direct download site.

USA Site
MD5 (HeX-i386-1.0.3-final-usb.img.gz) = 5fb1498b3437fada0b38602324d8f5e0

Usage instructions are simple:

dd if=/path/to/HeX-i386-1.0.3-final-usb.img of=/path/to/usbstick/device bs=1M

Look for the new HeX 2.0 to be out soon, all based on FreeBSD 7.0R!

Note that some usb sticks will be smaller than others (even if it's "2G") and that even if you write it and dd produces an error saying that not enough space is available... this is OK and your HeX LiveUSB will still work fine.

Cheers,
JJC

Friday, February 29, 2008

Security Torrents

To fill the need to host and download multiple large security related torrents, I have put a tracker online at http://www.redsphereglobal.com:88. You will primarily find items on this site in the following categories:

Toolkits
Anything that I or various other contributing members find useful, relevant or fun with respect to security. Current items that will go into this category are the various HeX (all) releases and InProtect LiveUSB releases.

Distros
Any custom distributions that have been designed to fit security needs and/or perform specific tasks.

Packet-Captures
Any large packet captures or trace files that are obviously not going to fit on the www.openpacket.org site. There is one up there now, it is the malicious traffic that Richard Bejlich captured at the 2007 Shmoocon. This torrent was created and added by giovani...so a shout out goes to him!

Having said all of that, we will (as with all trackers) need seeders. So if you have a little extra bandwidth and/or want to contribute in any way please let us know!

Cheers,
JJC

Tuesday, February 19, 2008

InProtect LiveUSB 0.80.3 Beta!

Though the InProtect project has not made a large number of public postings lately (beta releases and the like...) we have been quite busy. We will soon be releasing a tarball of the latest 0.80.3RC1. That is not, however, the purpose of this article but rather I am releasing a liveUSB image that is an entirely self-contained and functioning installation of InProtect on a FreeBSD 6.3-Current system.

I came up with the idea to create the InProtect LiveUSB when someone requested that I build one for another project that I am an active member of (HeX). Unfortunately it has taken me several months to get the time put together to actually build this tool. Having said that, I am quite pleased with the outcome and functionality of the tool. Placing this tool onto a USB thumb drive gives the user extreme versatility from the perspective of security. Obviously the nature of a USB thumb drive is not terribly secure; we can put them in our pocket and have them fall out in a parking lot where anyone could conceivably pick it up and snag the data off of it and multiple other scenarios. I am more talking about the security of the location or client that may have a sensitive environment with sensitive data and the like. In this scenario the USB device could be taken in and left with the organization, post scan, that has such sensitive data. Again though, the primary purpose of this build is to allow for a solid demo of the InProtect system.

As I said earlier, the system was built using FreeBSD 6.3-Current, ontop of this I built fluxbox (and several applications such as firefox), mysql51, apache22, php5 and several perl modules that are InProtect dependencies. I manually configured all of the components to work with InProtect, the installer currently does not work on freebsd though I am in the process of building a port. In-short, and as stated earlier, this is a fully functional InProtect scanner with a few things that need to be completed by the end-user; Nessus 3.0.x install and jpgraph for php5 install.

The Nessus and jpgraph items are not included in this image due to their licensing restrictions (not GPL). It is for this reason they must be manually installed.

First you will need to download the InProtect LiveUSB 0.80.3 image here:

http://www.redsphereglobal.com/data/tools/security/live/inprotect-i386-0.80.3-beta.usb.img.gz
MD5 (inprotect-i386-0.80.3-beta.usb.img.gz) = 605a5b20d754ea7e6305922695f301ba
SHA256 (inprotect-i386-0.80.3-beta.usb.img.gz) = 1d562d17db0ef4e3afefcca18fd40932b7faecdddd673910c3ad11a4aab4434b

After obtaining the image and gunzipping it you will want to use dd to write it to a 2G or larger USB thumb drive. NOTE that you want to write it to the device itself and NOT to a specific partition on the device. Also, if you didn't figure it out... this will overwrite anything that you may currently have on your thumb drive.
dd if=/path/to/foo/inprotect-i386-0.80.3-beta.usb.img of=/dev/da0 bs=1M
Your output file path may be different than /dev/da0 (this is mine on a freebsd boxen). The key is that you are writing directly to the device address and NOT to a partition, that will NOT work. Assuming that you have a thumb drive and computer capable of USB2.0 this process should take around 10 minutes to write all of the data.

At this point you should be able to boot from your new shiny LiveUSB thumbdrive. The initial login details are simple (these ARE case sensitive so pay attention!):
Username: InProtect
Password: inprotect
Once logged in type startx to get into fluxbox. From here, if you are not familiar suggest playing around just a little bit. A few tips, this isn't windoze, you access the main menuwith fluxbox, I by right clicking anywhere on the desktop. The image to the right shows the menu of the InProtect LiveUSB. The highlighted option will take you to the Nessus and jpgraph installation instructions.

Even before you install Nessus or jpgraph you will be able to login to the local instance of InProtect by selecting the InProtect menu option as displayed below. Once you have selected the InProtect menu item, you will be able to use admin / admin for the login and password to access the local instance of InProtect.

Note that until you install Nessus you will not be able to run any scans.

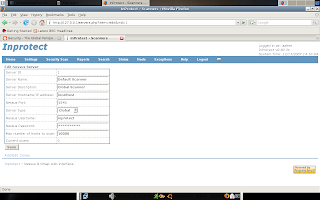
In this image I have already created a default scan zone and default scanner so that once Nessus is installed and the Nessus user created, as noted in the instructions contained on the image, the system is fully functional and scans can be immediately created and executed.

As always please feel free to contact me or leave any comments, criticisms, suggestions or otherwise that you might have.

Cheers,
JJC

Friday, February 15, 2008

HeX 1.0.3 LiveUSB (CNY Release)

After much adeau, here it is! Instructions for usage are quite simple, dd it to your usb thumb drive (the drive, not a partition or it will NOT work). This image includes all of the same features as our mainline HeX 1.0.3 release but is on USB not CD, the filesystem is therefore also writable. You will need a minimum of a 2G Thumb Drive or Memory Stick to write this. I say "Memory Stick" because I have heard rumor of some people using SD rather than USB Thumb Drives to use this tool.

So for example on my freebsd system I would dd as follows:

dd if=/path/to/foo/hex-i386-1.0.3.usb.img of=/dev/da0 bs=1M

command is simple... if is the Input File, output is the Output File (in this case it is the da0 device) and bs=1M is setting the block size to 1mb - this helps to speed up the write process.

Downloads:
USA Site (521MB)
USA MD5 Verification
USA SHA256 Verification

Malaysia Mirrors to be populated soon, I'll post them when they are.

Cheers,
JJC

Thursday, January 10, 2008

How do I know if my Snort implementation is working?

How do I test Snort? How do I know if Snort is sniffing packets? How do I know if Snort is running properly? How do I generate a test alert with Snort? Recently, and over the years, I have regularly seen people join the #snort channel on freenode and post these very questions to the snort mailing lists. Perhaps this little article will index properly in the search engines and end their questions, this is of course assuming that they know how to use a search engine ;-).

There are really several ways of testing snort, some much more complex than others. Probably the most simple way is to define a custom rule that you can easily produce the traffic to trigger the alert. This can be done by creating a simple rule that looks for traffic of a certain type, to a certain address or many other ways but for the purposes of this article we will be looking for traffic to a certain address (as this tends to be the most easily produced). We begin by creating a custom rule either in a new rules file or by adding the rule into an existing rules file. To simplify this you can download the rule from the url below:

https://secure.redsphereglobal.com/data/tools/security/snort/rules/snort-test.rules

Once you have downloaded this rule file and added it to your snort.conf so that Snort has loaded it, simply generate traffic from the monitored network to one or more of the following hosts: 121.175.169.102,193.71.199.6,200.123.165.130. This traffic can be of almost any type. I will typically browse via browser or telnet to a standard IRC port (at the time that I wrote this, these hosts were on the known C&C list) such as 6666, 6667 ....

Once this is done you will see the alerts being generated by snort (assuming that everything is configured properly).

As a second method, you can attempt to generate traffic that an existing snort rule can detect and alert on. To do this, I suggest using a tool such as Metasploit to generate actual attack traffic. You will want to test it against a host that you own, I certainly am not advocating attacking someones network with Metasploit from your network, this host should either be intended to be a test host, and/ or be immune to the attack. A simple example would be to enable the web-iis.rules from snort.org and launch an attack against one of your patched webservers from metasploit in an attempt to exploit MS01-23 using the Metasploit Framework Exploit. This will in-turn generate the WEB-IIS ISAPI .printer access alert to fire.

Either of those two methods should allow you to test your Snort installation, there are some other tcpreplay type tools that you can generate traffic from some signatures with, but by and large they are not effective tests.

Regards,
JJC

HeX Virtual Appliance Image: 1.0.2R

While I have not yet had time to create images for multiple Virtualization technologies, I did finish the image for VMware. Please obtain it at the below URL.

This image is 825M in size and will decompress to a 3G VM.

https://secure.redsphereglobal.com/data/tools/security/live/HeX_1.0.2_VMware.tar.gz
https://secure.redsphereglobal.com/data/tools/security/live/HeX_1.0.2_VMware.tar.gz.md5
https://secure.redsphereglobal.com/data/tools/security/live/HeX_1.0.2_VMware.tar.gz.sha256

Enjoy,
JJC

Thursday, December 13, 2007

InProtect Update...

And a few operational notes....

We are working hard to get out the next RC for your scanning pleasure. In the meantime, please continue the use and bug reporting, it's been great thus far!

Now, as to a big bug and how to properly handle it. In previous versions of InProtect you were able to control the number of scans with the max_scans value in the Nessus Servers configuration dialogue. Unfortunately with the modification of the nessus_run.pl script to streamline the scanning process, the max_scans variable does not properly control the actual scans being processed by the scanner. A simple example is as follows;

Lets say you schedule a scan with 60 hosts (IP Addresses) to be scanned and have limited in the Nessus Scanner Max_Scans setting a maximum of 10 concurrent scans on said server. When this scheduled scan starts to run it will start out with 10 scans, once those begin to complete it will immediately say that it's running 20 scans then 30 and so on.

To remediate this issue, you need to do a couple of things...first lets go ahead and kill our sched.pl process so that we can clean up the database (if you still show multiple scans running and none are actually running "ps -auxxx | grep nessus"). Once this is complete, go ahead and look in your Inprotect database under the nessus_scan table for any record with a value of 'R' in the status field ( select * from nessus_scan where status='R';". If you find that you do have records with 'R' as their status, you need to set them as 'C' "UPDATE`inprotect`.`nessus_scan` SET `status` = 'C' WHERE `status` = 'R' ; ", you will also need to reset the current_scans value in the nessus_servers table "UPDATE `inprotect`.`nessus_servers` SET `current_scans` = '0';". After completing these steps you can now start your sched.pl up again. As another note, you may want to set all of the status values to 'C' just to clean up that table, once you restart sched.pl it will clean out all of the 'C' status scans and set their main schedule back to a scheduled status.

Now that we have cleaned up the remnants of the aforementioned bug, lets go ahead and talk about the current workaround. This workaround is fairly straightforward and consists of two simple modifications to your scan profile and your nessus server settings. First, let's get into the InProtect GUI and select Settings -> Nessus Servers -> Edit, at this point we will be modifying the value for Max number of hosts to scan and setting it to an extremely high number such as 10000 or more.


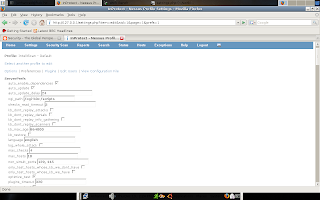
The next part of this workaround is to define the maximum hosts that will be scanned in the actual scan profile. This will tell the nessusd server itself how many scans that it is allowed to run at the same time. Select Settings -> Nessus Scan Profiles -> Edit your existing default profile -> Preferences, under the serverprefs section are the options max_checks and max_hosts. The max_checks value defines the number of test to be run concurrently against a single hosts and the max_hosts defines the maximum concurrent number of hosts that the nessusd server will scan. As you can see by the below image, I have set my default values to 4 checks and 10 hosts.


Regards,
JJC

Monday, December 10, 2007

managing snort rulesets cont...

I need to amend my previous posting about the usage of Oinkmaster to automate and manage your Snort rules. I had added in the simple script a command that updates the sid-msg.map in a fairly unclean way. There is, infact, included within the /contrib of Oinkmaster a nifty little script called create-sidmap.pl. This script reads all of the rules from the rules path that you specify and generates sid-msg.map output that can be redirected into a clean sid-msg.map file.

The location in my original posting that should be changed is highlighted here:
secure2# vi /usr/local/bin/autooinkall.sh
#! /bin/sh
#
# simple script to run oinkmaster and obtain bleeding threat updates
# in addition to the regular snort.org updates
#
/usr/local/bin/oinkmaster -o /usr/local/etc/snort/rules/
/usr/local/bin/oinkmaster -C /usr/local/etc/oinkmaster-bleeding.conf -o /usr/local/etc/snort/rules/
cat /usr/local/etc/snort/rules/bleeding-sid-msg.map >> /usr/local/etc/snort/rules/sid-msg.map
/bin/kill -HUP `cat /var/run/snort_em1.pid`
/bin/kill -HUP `cat /var/run/by.pid`
This should be changed to /path/to/your/create-sidmap.pl /path/to/rules/ > /usr/local/etc/snort/rules/sid-msg.map so that the whole thing looks like the following:
secure2# vi /usr/local/bin/autooinkall.sh
#! /bin/sh
#
# simple script to run oinkmaster and obtain bleeding threat updates
# in addition to the regular snort.org updates
#
/usr/local/bin/oinkmaster -o /usr/local/etc/snort/rules/
/usr/local/bin/oinkmaster -C /usr/local/etc/oinkmaster-bleeding.conf -o /usr/local/etc/snort/rules/
/usr/lobal/bin/create-sidmap.pl /usr/local/etc/snort/rules > /usr/local/etc/snort/rules/sid-msg.map
/bin/kill -HUP `cat /var/run/snort_em1.pid`
/bin/kill -HUP `cat /var/run/by.pid`
Regards,
JJC

Monday, December 3, 2007

HeX 1.0.1R LiveUSB Image

After receiving numerous requests to create a HeX Live USB Key Image, I have completed it. This image includes all of the standard tools that you will find on HeX and is writable; so you can update things (signatures etc), make changes and so on.

To use this tool, simply download it from the below location, decompress it and use dd to place it onto your USB Key. If you are not familiar with the dd syntax it's quite simple really; dd if=/path/to/extracted/hex-i386-1.0.1.usb.img of=/dev/da0 (your USB device). Note, that you should not dd this to a mounted partition, it will not work. You need to dd onto a USB Key that you don't mind losing the data on, because this will overwrite everything on that key. You can create a small partition after the dd (this of course assumes that you know how to do this, leaving the existing partition in-place) and have that to write data to etc...

This image does require a minimum 2G key (actually uses 1.75G), and has no minimum memory requirements (other than standard fbsd and X requirements).

https://secure.redsphereglobal.com/data/tools/security/live/hex-i386-1.0.1.usb.img.gz
http://secure.redsphereglobal.com:8080/data/tools/security/live/hex-i386-1.0.1.usb.img.gz
MD5 (hex-i386-1.0.1.usb.img.gz) = cd7489ba0a2a1fe824d286c72eee6842
SHA256 (hex-i386-1.0.1.usb.img.gz) = ffbb428145e0184d3848e45afee0d10ba41a4d9177688db10befc943dd4058f5

Please test this out and let me know how it works for you, or let the entire team at rawpacket.org know.

Regards,
JJC

Thursday, November 8, 2007

InProtect 0.80.0 Beta Released!

So we have *finally* managed to get the 0.80.0 Beta out the door, unfortunately the new packaged does not include any of the new info for the install or upgrade (there are twelve of us working on this). I'll be covering some of these topics in follow up articles over the next day or so.

Get the InProtect 0.80.0 Beta Here!


For now, let's talk about some of the major changes that we have incorporated into this version.

Gui:
  • Completely revamped menu system, access control driven.
  • User customizable dashboard.
  • Html and PDF report formats match.
  • Exportable xls reports.
  • Cleaned up excessive and unneeded sql queries to enhance speed.
  • Role-Based permissions.
  • Exception list for hosts.
  • Host specific lookup capabilities.
  • Cleaner interface.
Database:
  • All passwords are encrypted using user definable cryptographic standards such as blowfish.
  • Sensitive data is encrypted.
  • Database structure modified to allow for role-based permissions.
  • Database structure modified to enhance and improve large query response (including indexing).
Engine:
  • Max server scans are now run in a single session rather than multiple individual sessions, this reduces the load on both the nessus scanner and the InProtect console server.
  • Encryption and decryption functions added for sensitive data.
  • Multiple unneeded queries removed to enhance performance.
  • Query function creation and destruction cleaned up to enhance performance.
That is basically a quick run-through of the new features (there are more.. but these are the big ones IMHO). There are a few additional perl libraries that are not yet mentioned in the documentation contained in the 0.80.0 tarball but are required in addition too those mentioned in the documentation, I'll list them here for you.

New Perl libraries:
  • Crypt::CBC
  • MIME::Base64
  • IO::Socket
  • POSIX
  • Socket
This should be some good info to get you started for now, but as I said earlier, I will be posting some additional information (detailed info) for new installs and upgrades over the next few days. I will also try to update the official wiki and FAQ with these instructions.

So, for now feel free to download and play with it, let me know what you think, I can usually be found in #inprotect on freenode.

Cheers,
JJC

Tuesday, October 9, 2007

HeX Live Pending Release


For all of you anxious packet monkeys out there, the HeX LiveCD 1.0R will soon be available. We are running through extensive tests and bug fixing excersizes right now, but anticipate releasing this new version within the next week. I'll post an update once released, as well as the standard US mirrors.

This project has also been gaining a good amount of momentum and continued community support. I would like to thank all involved, esp geek00l and chfl4gs_ (the core founders)!

If you want some additional information concerning this project, please check out www.rawpacket.org!

Cheers,
JJC

Tuesday, July 17, 2007

OSSIM, is it ready?

A project that I have been keeping my eye on for a while is the OSSIM (Open Source Security Information Management) project: http://www.ossim.net/

I have been apprehensive to try this one out, due to some fairly negative feedback that I have received from numerous users and peers. That being said, I will be slapping it onto one of my FreeBSD boxes within the next few months and letting you know what happens.

JJC